Tuesday, December 24, 2013

Honeycombed Pebbles

Sometimes it's fun to try a tutorial or two to see how someone else does a particular effect.  Faux rock and stone looks interest me, as do mosaics. When I recently stumbled on some tutorials by Leggende Segrete, I had to give her Glass Mosaic Beads a try.  These pieces look to me like shiny pebbles with a sort of honey-combed effect, hence the name. 
 For the first set I made, I used homogeneous colors in the gold/orange/yellow family.  As you can see in the photo, the color turned out to be so subtle it was almost not visible.  The gold composite leaf underneath does shine through clearly in these.

I decided to work with gold again, and use more definitive colors.  The next batch pictured on the sand dollar have fuschia and green coloration.  More color, but still somewhat subtle.  
Next, I tried using silver composite leaf for the background, and went with blues and purples.  This combo looks more like painted rocks, and they're very pretty. 


Last, I had to see how little honey combed pebble earrings would look.  They're rather sweet, and not something you see every day.

Wednesday, December 18, 2013

Getting the Colors "Right"

As you may have guessed, I like to play with dichroic and opalescent looks in polymer. I have found the iridescent flakes are very useful when creating an opal look, but I have not been completely satisfied.  One thing missing has been color control.  I tried manipulating the background using metal leaf, alcohol inks, and glitters.  While I was able to get some lovely colors, I couldn't seem to control which colors I got, and where they appeared.  Obviously, it was time to experiment some more.

The pendant to the left demonstrates the use of the iridescent flakes on a colored background.  I like the effect of the smooth sparkle and color magnified by the textured black surrounds.  However, there is no real control of the color of the opals other than through the use of a colored background.  As you can see, the opals appear multi-colored.

Today, I'd like to share with you my latest iterations of faux opal.   I wanted to be able to create specific colors when and where I wanted them.  The trick, at least for me, turned out to be using alcohol inks, iridescent flakes and translucent liquid polymer to create a slurry. When baked on a metal leaf background, the slurry effect has depth, sparkle, fire and the colors I wanted.

Below on the right, are three pendants.  In the one on the left, I concentrated on a purple coloration.  I also included a small section of blue and yellow for contrast and interest.  In the middle piece, I focused on an overall blue, while in the piece on the right I used green and yellow coloration.


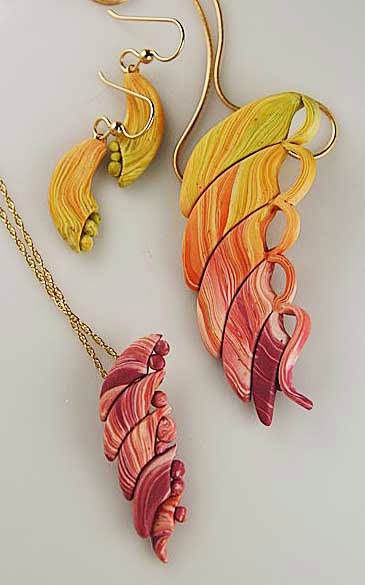
The last photo shows 2 pendants with my version of a "fire opal."   On these, the use of reds and oranges in the background as well as in the flakes seems to have added additional depth and inner glow.


I'm really quite pleased with the direction these experiments are taking, and plan to play some more.

 I'm also going to have to work on more natural looking settings, but that's a future project.

Sunday, December 15, 2013

From Yesterday....

Told you I'd have to do something with the canes from yesterday....So, here are a few cuff bracelets to show more variations of the cane patterns.  The 2 cuffs to the right were made from canes I put together based on the geometric core cane.  The other 3 cuffs below were decorated with canes from the kaleidoscope patterns pictured in yesterday's post.  It's always fun to see the clay move to something you can use.

Saturday, December 14, 2013

Kaleidoscope Fun

Today I taught a workshop on making canes based on a simple cane "core."  The kaleidoscope canes we created in the afternoon were especially pretty, and one of my favorite activities.
Using a palate of compatible colors, participants made several simple canes: Skinner blend bull's eye, regular bull's eye, pinwheel and wedge canes.  These canes were combined into a larger conglomerate cane, such as the one pictured to the right.

This core cane was then formed into a triangle and reduced.  Cut and recombined, the cane became different 6 sided and square canes, pictured at the left.
This is a great activity,  and allows you to work on color, form and design all at one time.
Many of you have probably approached canes in this manner. I never tire of this process.  The end results are always lovely and often unexpected.


Here is another example showing the initial "core" made of a variety of simple canes, some hexagonal canes and a square cane made after reducing the core,and finally a photo of some mobius and triangle beads made from one of the hexagonal canes.
  One more set in another color-way. Then I need to get busy, making beads and other things from these canes!


Saturday, December 7, 2013

Making Silk Screens

As I mentioned in my June 30th posting, I spent a week at the Arrowmont School for Arts and Crafts, studying with Seth Savarick. The focus was surface textures and techniques, and we spent a great deal of time learning about silk screening, and making our own silk screens for use with polymer.  The real trick, besides being sure we had everything set up correctly in the dark room, was finding the right moment with the right amount of sun to cure the screens.  Seth, from southern California, is used to just walking out into his yard whenever he wants to make a screen. Arrowmont is in Tennessee, and we were battling with early summer thundershowers that would descend upon us without much warning.  It got a little comical - we'd be in the midst of working or of listening to new information and someone would shout, "SUN!" We'd drop whatever we were doing, grab our screen setups, and dash out for our minute of sun.  We didn't need much time, but getting it was sometimes a real trick.

I have finally put together some pieces made from sheets of polymer I made up from silk screens.  A few were made with screen overlays.  Take a look!

This purple, gold and silver iris pendant was fun to make.  I started with a Skinner blend base in dark to light purples.  Then, I used gold and silver paint in sections on the silk screen and dragged the squeegee across the surface.  The result is a variation in both the background and in the colors in the foreground.

 The midnight blue pieces are half-lentils with curved top surfaces on a flat, silver leaf covered backing.  There are two different stencils used on the surface.  One made the periwinkle small squares and dots while I used another stencil to add the silver diamond and star-burst shapes.  The surface really looks like a night sky.


The green bamboo pieces were also made with 2 different stencils: one for the bamboo leaves, the other for bits of gold splash.

The deep purple leaf set was set up a bit differently.   I used 2 different silk screens that needed to be placed precisely to ensure that the "fill-in" color landed within the outlines.


Since I came home, I have made some of my own screens.  You'll see some of them down the road when I get out my paints and screening set up.  The color on the polymer from the paints is really lovely, and doesn't show up as well on the computer screen as it does in person.

Thursday, December 5, 2013

Pendanitas!

Most of my pendants are of a medium size, and, as I experiment with some processes, they sometimes get a bit larger.  However, there are those who prefer smaller items, and with the holidays in sight, I have been making some smaller pendants.  I call these pieces "pendanitas" or little pendants.

Here are a few samples, in different styles and using different techniques.  The black pieces are pretty self-explanatory.  I like the juxtaposition of the simple geometric black shapes contrasting with the 3-D flowers and butterfly cane.


The pieces below on the left are made with gold leaf composite, alcohol inks for color, and other bits and pieces such as gold flakes.


The two rectangular pieces are part of my "faux opal" collection. This is a process that keeps evolving, and I'm having fun with it.

Tuesday, November 19, 2013

On a Bas-Relief Binge

There are a lot of photos here, primarily of brass cuffs.  I've been on a bit of a roll...It didn't take long before working with the cameo look evolved into making sheets with overall designs. These sheets are more like bas-relief, and lend themselves to making items such as bracelets, cuffs, and pendants.

First, I used sheets of translucent clay imbedded with gold or silver leaf as a base for the bas-relief.
These were later sprayed with preservative to protect the leaf, and have a shine and sparkle.

I also worked with plain clay.  I discovered that these pieces looked best when I textured the clay first before adding the bas-relief pieces.  I left these pieces with a matte finish (below).


As you can tell from the all the shots here, I've been having a great time!


Tuesday, November 5, 2013

Black-Line Transfers

There are probably hundreds of techniques in polymer I haven't tried yet, and I'm sure more are being explored and developed every day on the worktables of polymer artists. I realized the other day that one technique I haven't used is black-line transfers.  Actually, I've done very little with transfers at all, and decided to give black-line a try.

I made a few bracelets... actually, I'm on a roll, and can't seem to leave this particular project alone.
For materials I'm using brass channeled cuff and bangle forms. The base clay is translucent and I've mixed in sheets of metal leaf.  In some cases, I also added just a bit of sold clay to color things slightly.  You don't need much color at all to affect translucent.  I plan to try using alcohol inks, too, since they'll create a brighter color without affecting the translucency as much as opaque clay does.  The black-line designs are from copyright free publications designed to be used in projects.

After the pieces are baked, I've added a light coating of PYM  II.  Since these pieces will be on the wrist and will probably get a good amount of handling, I wanted to protect both the design and the metal leaf in the base.


Pictured here are some of the first cuffs I made.  I'll try to get back here with some other examples soon.

I'm back - here are some bangles made with the same technique.  Less design, but still quite pretty.  The bolder design on the aqua seems to show up well in this narrower format.

Sunday, November 3, 2013

Cameos & Wedgewood

 Three dimensional pieces can be accomplished in different ways such as through texture, surface additions, or shape manipulation.  I've always loved cameos, probably due in part to the raised surface features which give that 3-D appearance.  Today, I'd like to share a few pieces with the cameo effect, accomplished using 2 very different techniques.

First, the earrings.  These were made using the sutton slice technique.  If you're interested in learning more about this technique, a Google  search will provide you with several examples and some nice tutorials.    The trickiest part of this process for me is getting the surface design to stick to the base color.  If you work slowly and carefully, the pieces adhere and the result is really lovely.  I do not roll the resulting design flat.  I prefer to leave the design raised for that "cameo" effect.

The pendants below are designed to look like pieces of Wedgewood, the famous ceramic ware developed by the Josiah Wedgewood, an English pottery maker.  The powder-blue color is classic, as is the white raised cameo design.  These two pendants were not made with the sutton slice technique.  They were made using a technique presented at a workshop by Lynne Ann Schwarzenberg,  an outstanding polymer artist.
Lynne Ann has developed her own approach to making the Wedgewood look in polymer.  She has developed a special recipe for mixing clay to achieve the desired color.  In the workshop, we mixed clay and created base pieces.  Then we following a separate recipe for the white clay which was baked and cut into various designs and shapes.  The pieces were then placed on the bases. This process is much more time intensive than the sutton slice technique but has some distinct advantages.  First, we were able to make base pieces that had curve and dimension instead of just being flat surfaces. Also, the white cameo pieces were crisp and clean, and were able to be placed on the bases anywhere we wished.
A third "cameo" approach uses push molds with 2 different colors of clay.  This approach has its own characteristics - and challenges.   Different looks from  different approaches.  I imagine there are other methods to achieve the cameo effect in polymer clay that don't require carving.   If you find any, please let me know!


Saturday, October 12, 2013

It Started with Snails.....

Sometimes, you just don't know where you'll end up.
I'd been playing with some partial blends - blends where the individual colors still stand out - and twisting them around.  This made me think of snail shapes, so I made up some snail pendant and earring sets.  I love the way the twisted patterns turned out, and the colors are warm and vibrant.  Wish the snails in my yard looked like this.  ;)


I picked up some of the clay pieces I'd cut off, and found myself shaping this yellow and red pinched pendant.


I let my hands fiddle with more pieces and suddenly these curved horn pieces emerged.  Making them in graduated sizes resulted in a pin and a pendant.
Along with this really nice rainbow pendant with pearls instead of a pot of gold.
I wasn't done yet, though.  I still had a couple of slices from Ikat canes.  Here are the pieces that resulted from using those canes to make more horn shapes.  Kinda neat - and tons of fun!

Sunday, October 6, 2013

An Ikat Fall

The colors are shifting in the leaves, and trees are ablaze here.  Even a rainy day is pretty, and just intensifies the tones.  I was inspired to make some Ikat canes and convert them into leaves. Of course, they needed matching bracelets, too.  I'm particularly fond of this lime-orange-purple Ikat color combination. It does look like so many of the leaves falling from the trees in my yard.

Then I drifted to a purple-red-green combination.  So many of the deeper maples have all three shades together on each leaf.

Finally, I couldn't resist a turquoise-purple-deep green combination.  Granted, none of the leaves around here are actually sporting these colors - but wouldn't it be amazing if they were!

Friday, October 4, 2013

Taking a Side-Step

A few days ago, I was giving a polymer workshop on making dichroic glass looks with polymer.  I use a combination of techniques I've run across which combine composite metal leaf, translucent clay, alcohol inks, texture sheets, glitter, and Magic Gloss.  I particularly like the way texture and designs look when impressed into this layered mix.  It is also possible to just let the colors and shine "do the talking."  This first photo shows two pieces with designs impressed from past postings, and a new fall-toned piece that just seems to glow from inside.

One of the workshop participants had purchased some iridescent flakes and wanted to know if they would work with this technique.  Having played with flakes just a little in the past, I knew they would not accomplish the dichroic look we wanted.  His question, however, made me wonder what would happen if I combined flakes with the dichroic bases we had made.

So, when I got home, I did a little experimentation and thought I'd share it here.  This first picture is of one of the clay bases I'd made in blues, purples and reds.

The next photo on the right shows two pieces.  The pink piece with the blue tip was made by sprinkling pink iridescent flakes on the base from the cut out and adding some liquid polymer.  The green piece was made from mint colored flakes on a deep green and olive base.  Some of the base color shows through the flakes a little, but the glitter doesn't show except around the edges, and on close inspection, the metal leaf is not apparent at all.

The final snapshot below is a piece made with blue tinted iridescent flakes over a base from the same sheet (above) that I used for the pink piece. This piece has much more color variation than the other two.  Since the base was similar to that in the pink piece, I'm assuming the blue flakes are the main reason for the color variations.  I like this piece the best.